
Getting Started
Anyone with a Brandon University email address and password can use their credentials to login to Microsoft 365/Office 365 and use any of the tools there, including Teams, Word, Excel, and others. It also allows you access from there to install those tools to your personal laptop/desktop if desired. The instructions below will explain how to do that.
Open a web browser
Go to portal.brandonu.ca


You will now have Teams open and running through your device’s browser.
Search for the O365 tool you want (in this case MS Teams)
Install the App to your device
Open the App
You will be prompted for a login, use your BU email address and password
Join a Team
A team is a collection of people, conversations, files and tools – all in one place.
You may have been given a Team Code for a team someone is inviting you to. Follow the steps below to join that Team:
Start by getting connected to Microsoft Teams.
Click on the button that says, “Join or Create Team”, in the upper right corner.

Enter the given team code under “Join a team with a code”.

You will now be added into a Team.
To create a team, start by getting connected to Microsoft Teams.


The code here can now be copied and sent out to anyone you wish to join your team.
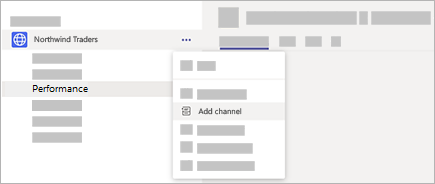
To create a standard channel, start in the team list. Find the team name and click More options  > Add channel. You can also click Manage team, and add a channel in the Channels tab.
If you want a focused place to discuss sensitive information such as budgets, create a private channel for your team. Only owners or members of the private channel can access it. To understand who can view what in a private channel, see Private channels in Teams.
To create a private channel for a team:
Go to the team you want to create the private channel for and choose More options > Add channel.
Enter a name and description for your channel.
Under Privacy, select the down arrow on the right, and then select Private – Accessible only to a specific group of people within the team.
Select Add. This adds a private channel to the team.
As a private channel owner, you can add or remove members, and edit private channel settings. Each person that you add must first be a member of the team.
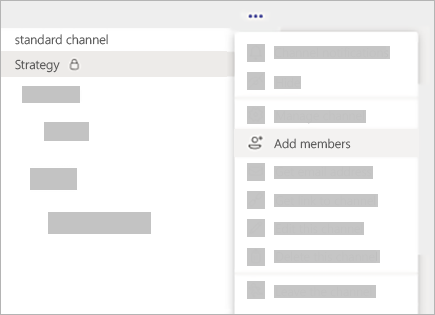
To add members of your team to a private channel:
Next to the private channel name, select More options > Add members.
Use the Members and Settings tabs to add or remove members and assign roles. Your private channel can have multiple owners and up to 250 members.
When you’re ready, select Done. Members can now post messages in the private channel.
As a team owner, you can turn on or turn off the ability for members to create channels. To see and change this option, go to the Settings tab for the team.
A standard channel is open for all members and anything posted is searchable by others. You don't add members to a standard channel because the team has access.
Tap Teams  , go to the team name, and tap More options
  > Manage channels.
Tap Add  and enter a name and description (optional). This adds a standard channel to the team.
You can create up to 200 channels over the life of a team. That number includes channels you create and later delete.
Only those users who are owners or members of the private channel can access the channel. To understand who can view what in a private channel, see Private channels in Teams.
You can create up to 30 private channels over the life of a team.
To create a private channel and add members in Teams:
Tap Teams , go to the team name and tap More options > Manage channels.
Tap Add in the header and enter a name and description (optional).
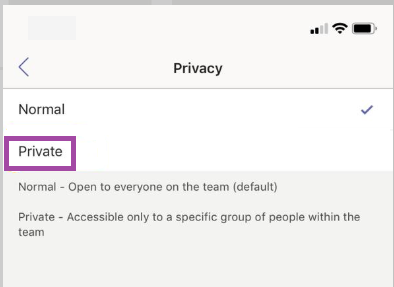
Tap Privacy and then Private as shown.
Tap the back button < and then Done.
This adds a private channel to the team and opens the Add members screen.
FYI, you can skip step 5 and add members later.
Select More options next to the channel name. Then, use the menu to edit, delete, hide, or leave the channel as desired.
To start a conversation with the whole team:
Click Teams
Pick a team and channel, write a message and Send
To start a conversation with a person or group:
Click Chat
Select the name of someone you previously chatted with from the recent list
or
Click New chat; type the name of the person, write your message and click Send
You can edit any message that you have sent to a chat or channel.
> Edit. There's no limit to how many times you can make changes to a sent message.
 and select the delete option.
Edit a sent message
and selecting the edit option. and select the delete option.To instantly start a meeting in a channel:
Click the channel you wish to have the meeting in
Click Meet in the upper right hand area of the screen to start the meeting
Enter a name for the meeting and invite people to join
Once a meeting has started, a large Join button will appear in the channel. Other team members may click the Join button to enter the meeting
To make a video call:
Click Chat
Click Video in the upper right hand area of the screen to start a video call in chat
To work with files:
Click Teams; pick a channel and click the Files tab toward the top of the middle screen
Choose to create, share, and co-edit files or links with others
To access assignments, there are two methods:
Method 1:
Click Assignments on the left hand toolbar
Select the Class you want view assignments in
Listed will be what has been Assigned and what has been Completed
Method 2:
Go to the Team you wish to view assignments in
Click the General channel (default channel when you enter a Team)
Click Assignments towards the top of the middle screen
Listed will be what has been Assigned and what has been Completed